Creating a bundler
Follow along as we recreate a basic bundler I found on github so we can see step by step how Webpack and Parcel figures out your javascript imports and exports!


I came across a really interesting Github repo, that showed some code on how to create your own javascript module bundler. It looked interesting, and I decided to check it out a bit more.
If you prefer to just look at the code directly, you can find the repo here: https://github.com/ronami/minipack. Otherwise, follow me along in recreating this step by step, so we can learn how bundlers like Webpack and Parcel work on a very basic level. I promise you, it's pretty interesting and will help you to understand some of the magic going on in the background!
Setup
Let's start by installing a couple of npm modules. We will have to have an AST parser (more on this soon), something to help us traverse said AST and we'll also include babel-core with the env preset so we can transpile the code into ES5 that older browsers understand as well.
$ npm install --save-dev @babel/core @babel/preset-env @babel/parser @babel/traverseNote: the $ symbolizes the command prompt, and I will use the same throughout this blog post. So whenever you see this, it's a command to be entered into your terminal of choice.
We will also have to create our test files, since we need something to bundle! Let's create 3 new files inside of a subdirectory, like src/. This is pretty common, you have your source files inside of a subdirectory to keep it separated from the utility files you have. We'll also create our bundler script file right now and start to fill it out with code in a bit. In a terminal, enter the following:
$ touch bundler.js
$ mkdir src
$ cd src
$ touch main.js hello.js location.js
You can of course recreate the same within your editor if you prefer.
These 3 files inside of ./src will symbolize our source code. We'll fill them in with some example code now. In each file, add the following:
import hello from './hello.js'

console.log(hello)
./src/main.js
import { location } from './location.js'

export default `Hello ${location}`
./src/hello.js
export const location = 'World'./src/location.js
As you can see it's very straight forward from a javascript perspective. We import hello.js, that in turn import location.js. Both just exports a string. In the end we're just doing a console.log() and it prints out the strings from our imports, resulting in "Hello World".
This would never work in a browser however, since it has no notion of what an import statement does. Hence, we need to bundle our files so the browser can read it and make sense of it.
If everything is correct, you should now have a directory structure like this:
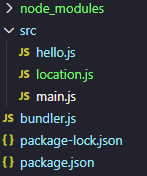
The Bundler
So, how does a bundler work? On a very basic level it will:
- Read an entry file
- Read all imported files
- Read all imported files of imported files
- While doing this, we need to create a graph of all files so we know how they relate to each other.
- Wrap it all up into one file that the browser can understand.
So, let's start with the most basic part. Reading the entry file.
In bundler.js, add the following:
const fs = require('fs')

const createAsset = filename => {
    const content = fs.readFileSync(filename, 'utf-8')

    console.log(content)
}

createAsset('./src/main.js')
./bundler.js
We start with importing fs so that we can read files. This is a native node module, meaning it is available in all installations of node. In createAsset() we just read the contents of the file, and print it out to the console.
Try to run this, and see what happens:
$ node bundler.js
import hello from './hello.js'

console.log(hello)
It prints out the contents of our main javascript file! This is great news, we know that we're reading the file correctly and can start to process it. Step 1 done!
But now what? This doesn't take us that far at all. We need a way to understand the code. We could string match on import and figure out what file to read next, but that seems like quite a bit of work. Instead, we'll parse our file into an AST.
AST?!
AST stands for Abstract Syntax Tree. It is a way to visualize the abstract syntactic structure of source code in a tree representation. Totally clear, huh? No, it wasn't for me as well. So let's illustrate it. Replace the code in bundler.js with the following:
const fs = require('fs')
const parser = require('@babel/parser')

const createAsset = filename => {
    const content = fs.readFileSync(filename, 'utf-8')

    const ast = parser.parse(content, {
        sourceType: 'module'
    })

    console.log(ast)
}

createAsset('./src/main.js')
./bundler.js
We'll import @babel/parser as well, which is a parser for javascript into an AST. Inside of createAsset() we'll tell it to parse our file, and finally we log it to the console again. We also need to tell the parser that the source type is a module.
Let's run this code instead and see what we get this time:
$ node bundler.js
Node {
  type: 'File',
  start: 0,
  end: 54,
  loc: SourceLocation {
    start: Position { line: 1, column: 0 },
    end: Position { line: 4, column: 0 },
    filename: undefined,
    identifierName: undefined
  },
  range: undefined,
  leadingComments: undefined,
  trailingComments: undefined,
  innerComments: undefined,
  extra: undefined,
  errors: [],
  program: Node {
    type: 'Program',
    start: 0,
    end: 54,
    loc: SourceLocation {
      start: [Position],
      end: [Position],
      filename: undefined,
      identifierName: undefined
    },
    range: undefined,
    leadingComments: undefined,
    trailingComments: undefined,
    innerComments: undefined,
    extra: undefined,
    sourceType: 'module',
    interpreter: null,
    body: [ [Node], [Node] ],
    directives: []
  },
  comments: []
}
Woah! That's pretty cool, huh? We now see a JSON object representing the code in our entry file!

It doesn't tell us too much since node suppresses some of the printouts, so let's use another tool to see all the information. Fire up a browser and go to https://astexplorer.net/
Copy our ./src/main.js and paste it into the left hand side, and you will see the full AST on the right:
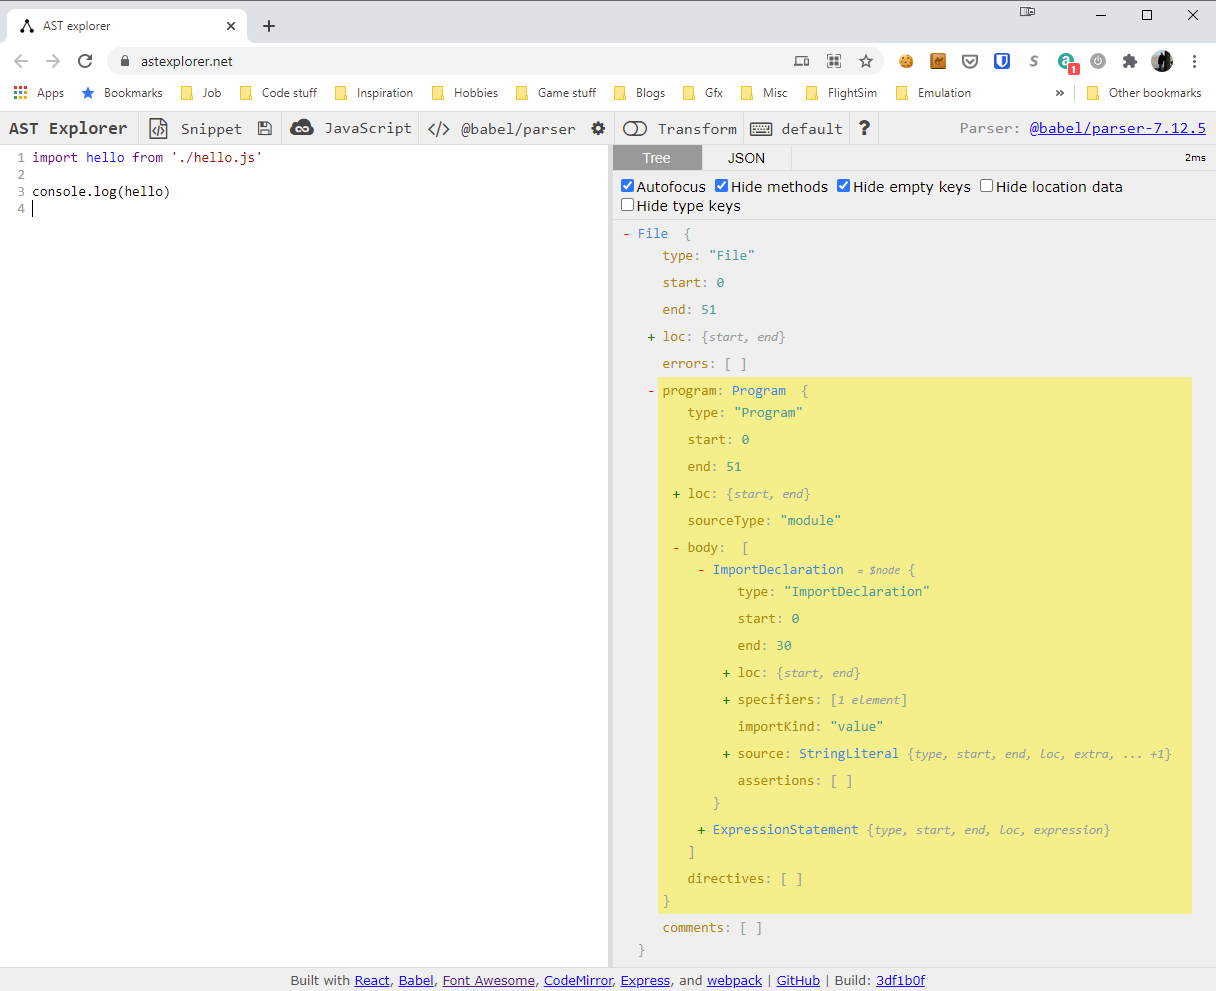
As you can see, under program.body you have the lines of our code, with all the information we would ever need about them. We can see that we have an ImportDeclaration, followed by an ExpressionStatement. It is the ImportDeclaration we care about, as that is our import of the next dependency. Open it up, and we'll get even more information. Click on source to open up that one as well, and lo and behold, value has the filename of our file we are importing. That means we have the information to complete step 2 as well!
Let's use this info to figure out which file we need to import next. We'll use traverse for this, which is a utility that helps us traverse an object tree recursively. Again, replace all the code in bundler.js with this:
const fs = require('fs')
const parser = require('@babel/parser')
const traverse = require('@babel/traverse').default

const createAsset = filename => {
    const content = fs.readFileSync(filename, 'utf-8')

    const ast = parser.parse(content, {
        sourceType: 'module'
    })

    const dependencies = []
    traverse(ast, {
        ImportDeclaration: ({ node }) => {
            dependencies.push(node.source.value)
        }
    })

    console.log(dependencies)
}

createAsset('./src/main.js')
./bundler.js
In this version, we also import @babel/traverse. Inside of createAsset(), we use this to get all ImportDeclaration's, and we push the value into a new variable we call dependencies. If you run this, you'll see that it holds the value of our imported file, ./hello.js.
$ node bundler.js
[ './hello.js' ]
Ok, so we know we can read the initial file, and get the dependencies of that file. It's time to start thinking about step 3 and 4. We need to do this for all dependencies, and we need to create a graph so we have enough information about how everything relates to each other. Let's fix up our createAsset() function a bit so it is more reusable:
const fs = require('fs')
const parser = require('@babel/parser')
const traverse = require('@babel/traverse').default

let ID = 0

const createAsset = filename => {
    const content = fs.readFileSync(filename, 'utf-8')

    const ast = parser.parse(content, {
        sourceType: 'module'
    })

    const dependencies = []
    traverse(ast, {
        ImportDeclaration: ({ node }) => {
            dependencies.push(node.source.value)
        }
    })

    const id = ID++

    return {
        id,
        filename,
        dependencies
    }
}

const mainAsset = createAsset('./src/main.js')

console.log(mainAsset)
./bundler.js
First and foremost, we need to keep track of each and every file. We do this in a pretty rudimentary way by just adding an ID. We create a new variable called ID and set it to 0 .
Inside of createAsset() we store this in a local variable and increment our global ID at the same time, and we return an object containing all the info we need at this point.
Run this, and you will see we have an object that we can work with when creating our graph:
$ node bundler.js
{ id: 0, filename: './src/main.js', dependencies: [ './hello.js' ] }
The code listings are starting to get a bit longer, so I will stop showing the whole file now. You can find the full listing at the end of this post if you can't find where to add something or get tripped up in any way. Instead I will only show the excerpt of the code around it. Ready? Here we go!
To build our graph we will create a new function, called... createGraph(). Who knew?
const createGraph = (entry) => {
    const mainAsset = createAsset(entry)
    const queue = [mainAsset]

    return queue
}

const mainAsset = createGraph('./src/main.js')

console.log(mainAsset)
new function, createGraph(), in ./bundler.js
This new function will call createAsset() for each import it finds. We know about the first one, so we'll add it directly to our queue.
We'll also change the function call at the bottom of our file to this instead. You should see that we're getting the very same log output as last time.
Did you notice something missing? We are getting the relative path to the file, because that is what is specified in the import! We need to do something about that. Let's import another native node module that can help us with this problem. At the top of our bundler file, add:
const path = require('path')top of ./bundler.js
path have some great functions to make it easy handling directories across operating systems etc. Now, let's continue with our createGraph() function. For each asset in our queue, we need to get a list of all dependencies, and add those to our queue as well. This way we'll recursively get all imported files. While doing this, we also need to make sure that the filename we load the file with is absolute from ./bundler.js. Replace the createGraph() function with this code:
const createGraph = (entry) => {
    const mainAsset = createAsset(entry)
    const queue = [mainAsset]

    for(const asset of queue) {
        const dirname = path.dirname(asset.filename)
        asset.mapping = {}

        asset.dependencies.forEach(relativePath => {
            const absolutePath = path.join(dirname, relativePath)
            const child = createAsset(absolutePath)
            asset.mapping[relativePath] = child.id

            queue.push(child)
        })
    }

    return queue
}
createGraph() in ./bundler.js
We still read our initial entry file and add it to the queue. After this we loop through everything we have in the queue so far with a for...of loop. From start, that will only be entry.
We extract the directory path of the current file we are processing on line 5. We also create a new mapping object on our asset to fill out with information soon.
We loop through each dependency we have listed on our asset (remember the object we return from createAsset()?). For each, we get the absolute path to this file by path.join'ing our directory with the relative path we have in the dependency.
Now we have the info we need to read the file. We'll call createAsset() for this file as well, and add a new mapping object to the asset so we can keep track of which dependency have which ID. I know, it sounds complicated but it'll make more sense when we run it and look at the log output.
We then push this new asset to our queue, which alters the array and we'll run another iteration of the newly added index with our for...of loop. This will continue until we don't have any more dependencies.
Lets run this and see what we get:
$ node bundler.js
[
  {
    id: 0,
    filename: './src/main.js',
    dependencies: [ './hello.js' ],
    mapping: { './hello.js': 1 }
  },
  {
    id: 1,
    filename: 'src\\hello.js',
    dependencies: [ './location.js' ],
    mapping: { './location.js': 2 }
  },
  {
    id: 2,
    filename: 'src\\location.js',
    dependencies: [],
    mapping: {}
  }
]
As you can see, we now get an array of all our files. If you look at the first one, you can see that we have a mapping object containing mapping: { './hello.js': 1 }. If we look at which object has id: 1, we can see that it is, in fact, hello.js. You'll notice as well that the path is different, it now has the src directory on it as well. You can also see that hello.js maps to id: 2, which in turn is location.js, and it ends right there since it doesn't have any mappings of its own.
We have everything we need, except for the actual code now. Let's go back to our createAsset() function and add that to the return as well. We'll also take the opportunity to add babel transpiling of our code - since we know a lot of browsers don't understand the import keyword, we want babel to remake it into commonjs instead.
So, again at the very top of the file, let's add our import of babel:
const babel = require('@babel/core')top of ./bundler.js
Now, let's add the transpiling step and the resulting js code to our return object:
const createAsset = filename => {
    const content = fs.readFileSync(filename, 'utf-8')
    const dependencies = []

    const ast = parser.parse(content, {
        sourceType: 'module'
    })

    traverse(ast, {
        ImportDeclaration: ({node}) => {
            dependencies.push(node.source.value)
        }
    })

    const id = ID++

    const {code} = babel.transformFromAst(ast, null, {
        presets: ['@babel/env']
    })

    return {
        id,
        filename,
        dependencies,
        code
    }
}
createAsset() in ./bundler.js
Conveniently for us, babel has a transformFromAst function we can use. We send in our ast and which preset we want to use. env is pretty much always a good choice. We also add the return of this to our returned object.
If we run our bundler again, we can see what has happened with the code.
$ node bundler.js
[
  {
    id: 0,
    filename: './src/main.js',
    dependencies: [ './hello.js' ],
    code: '"use strict";\n' +
      '\n' +
      'var _hello = _interopRequireDefault(require("./hello.js"));\n' +
      '\n' +
      'function _interopRequireDefault(obj) { return obj && obj.__esModule ? obj : { "default": obj }; }\n' +
      '\n' +
      'console.log(_hello["default"]);',
    mapping: { './hello.js': 1 }
  },
  {
    id: 1,
    filename: 'src\\hello.js',
    dependencies: [ './location.js' ],
    code: '"use strict";\n' +
      '\n' +
      'Object.defineProperty(exports, "__esModule", {\n' +
      '  value: true\n' +
      '});\n' +
      'exports["default"] = void 0;\n' +
      '\n' +
      'var _location = require("./location.js");\n' +
      '\n' +
      'var _default = "Hello ".concat(_location.location);\n' +
      '\n' +
      'exports["default"] = _default;',
    mapping: { './location.js': 2 }
  },
  {
    id: 2,
    filename: 'src\\location.js',
    dependencies: [],
    code: '"use strict";\n' +
      '\n' +
      'Object.defineProperty(exports, "__esModule", {\n' +
      '  value: true\n' +
      '});\n' +
      'exports.location = void 0;\n' +
      "var location = 'World';\n" +
      'exports.location = location;',
    mapping: {}
  }
]
As you can see, the new code doesn't almost even resemble the old. It's much more verbose, but that's because babel has transpiled the code into code that most browsers understand, even much older ones. In a real project we would tell babel which browsers to translate the code for as well but in this case we just used the default settings for everything. As you can see, we now have a commonjs require() call in there instead of our old import. So how does that work? Browsers don't have an internal require() call as well?
We will have to define it for the browser. We will do that in our actual bundle, which we will start to code right now.
Let's create a new function. We'll call it bundle(), because this will return our completed bundle. We will also change the function call into a call to createGraph and then a call to createBundle() with the graph as our argument. We'll also change our console.log to show the bundle. This is where we would normally save to a new file, but for now we will just log it to the console.
const createBundle = (graph) => {
    const result = `
(function(modules){

})()
    `

    return result
}

const graph = createGraph('./src/main.js')
const bundle = createBundle(graph)

console.log(bundle)
createBundle() and bottom of ./bundler.js
For now it's just a string literal that creates an IIFE, an Instantly Invoked Function Expression. This just means that it will instantly invoke the function; you could say it calls itself directly. This is perfect for us, since we want our new bundle to automatically start and get executed. We'll start with supplying our graph as arguments to this IIFE:
const createBundle = (graph) => {
    let modules = ''
    graph.forEach(mod => {
        modules += `${mod.id}: [
    function (require, module, exports) {
        ${mod.code}
    },
    ${JSON.stringify(mod.mapping)}
],`
    })

    const result = `
(function(modules){

})({${modules}})
    `

    return result
}
createGraph in ./bundler.js
Ok, this looks a bit hairy, but it'll make a bit more sense soon. We start by creating a new variable with an empty string. Then, for each file in our graph we create a template literal with an object containing all our scripts as keys. The printout of our console.log looks kind of funky due to the nature of template literals, but here is a beautifed version of it so you can see how it really looks:
(function (modules) {

})({
    0: [
        function (require, module, exports) {
            "use strict";

            var _hello = _interopRequireDefault(require("./hello.js"));

            function _interopRequireDefault(obj) {
                return obj && obj.__esModule ? obj : {
                    "default": obj
                };
            }

            console.log(_hello["default"]);
        },
        {
            "./hello.js": 1
        }
    ],
    1: [
        function (require, module, exports) {
            "use strict";

            Object.defineProperty(exports, "__esModule", {
                value: true
            });
            exports["default"] = void 0;

            var _location = require("./location.js");

            var _default = "Hello ".concat(_location.location);

            exports["default"] = _default;
        },
        {
            "./location.js": 2
        }
    ],
    2: [
        function (require, module, exports) {
            "use strict";

            Object.defineProperty(exports, "__esModule", {
                value: true
            });
            exports.location = void 0;
            var location = 'World';
            exports.location = location;
        },
        {}
    ],
})
beautified output of our template literals
As you can see, every key corresponds to our script IDs, and the value is an array with first the actual script, and then the dependencies listed. We need this for our commonjs that will follow here now. Replace bundle() with the following code:
const createBundle = (graph) => {
    let modules = ''
    graph.forEach(mod => {
        modules += `${mod.id}: [
    function (require, module, exports) {
        ${mod.code}
    },
    ${JSON.stringify(mod.mapping)}
],`
    })

    const result = `
(function(modules){
    function require(id){
        var [fn, mapping] = modules[id];

        function localRequire(relativePath){
            return require(mapping[relativePath]);
        }

        var module = { exports: {}};
        fn(localRequire, module, module.exports);

        return module.exports;
    }

    require(0)
})({${modules}})
    `

    return result
}
As you can see, we create a new function inside of our IIFE called require(). This is the require function that all our babel transpiled code will call. Inside of it, we first map our array in the incoming parameter into fn and mapping. In the above printout of our console you can see the array we're sending in each time. The first index is the code, and the second index is the mapping it has. Then we create another function called localRequire(). This is to take care of the dependencies. It's where we recursively call our require() function, but sending in the code from our mapped script instead.
We then create an empty exports object, and we run the code we sent in. Commonjs dictates that to all required functions you should send in the localRequire, module and the module.exports. When it has run, we just return our module.exports.
Finally, outside of our require() function, we start our first argument supplied.
This is a bit hard to wrap your head around at times, but take a good look at it, together with the outputted arguments and it'll start to make a bit more sense.
This is really all there is to it! If we run our bundle code again now, we can copy and paste the resulting code into a browser and try it out. If everything worked as it should, we will get "Hello World" back! So let's try that:
$ node bundler.js

(function(modules){
    function require(id){
        var [fn, mapping] = modules[id];

        function localRequire(relativePath){
            return require(mapping[relativePath]);
        }

        var module = { exports: {}};
        fn(localRequire, module, module.exports);

        return module.exports;
    }

    require(0)
})({0: [
    function (require, module, exports) {
        "use strict";

var _hello = _interopRequireDefault(require("./hello.js"));

function _interopRequireDefault(obj) { return obj && obj.__esModule ? obj : { "default": obj }; }

console.log(_hello["default"]);
    },
    {"./hello.js":1}
],
        1: [
    function (require, module, exports) {
        "use strict";

Object.defineProperty(exports, "__esModule", {
  value: true
});
exports["default"] = void 0;

var _location = require("./location.js");

var _default = "Hello ".concat(_location.location);

exports["default"] = _default;
    },
    {"./location.js":2}
],
        2: [
    function (require, module, exports) {
        "use strict";

Object.defineProperty(exports, "__esModule", {
  value: true
});
exports.location = void 0;
var location = 'World';
exports.location = location;
    },
    {}
],
        })
We now got the full output. This is what we would save as the bundled file normally, but in this case we'll just copy/paste it into a browser to test it out.
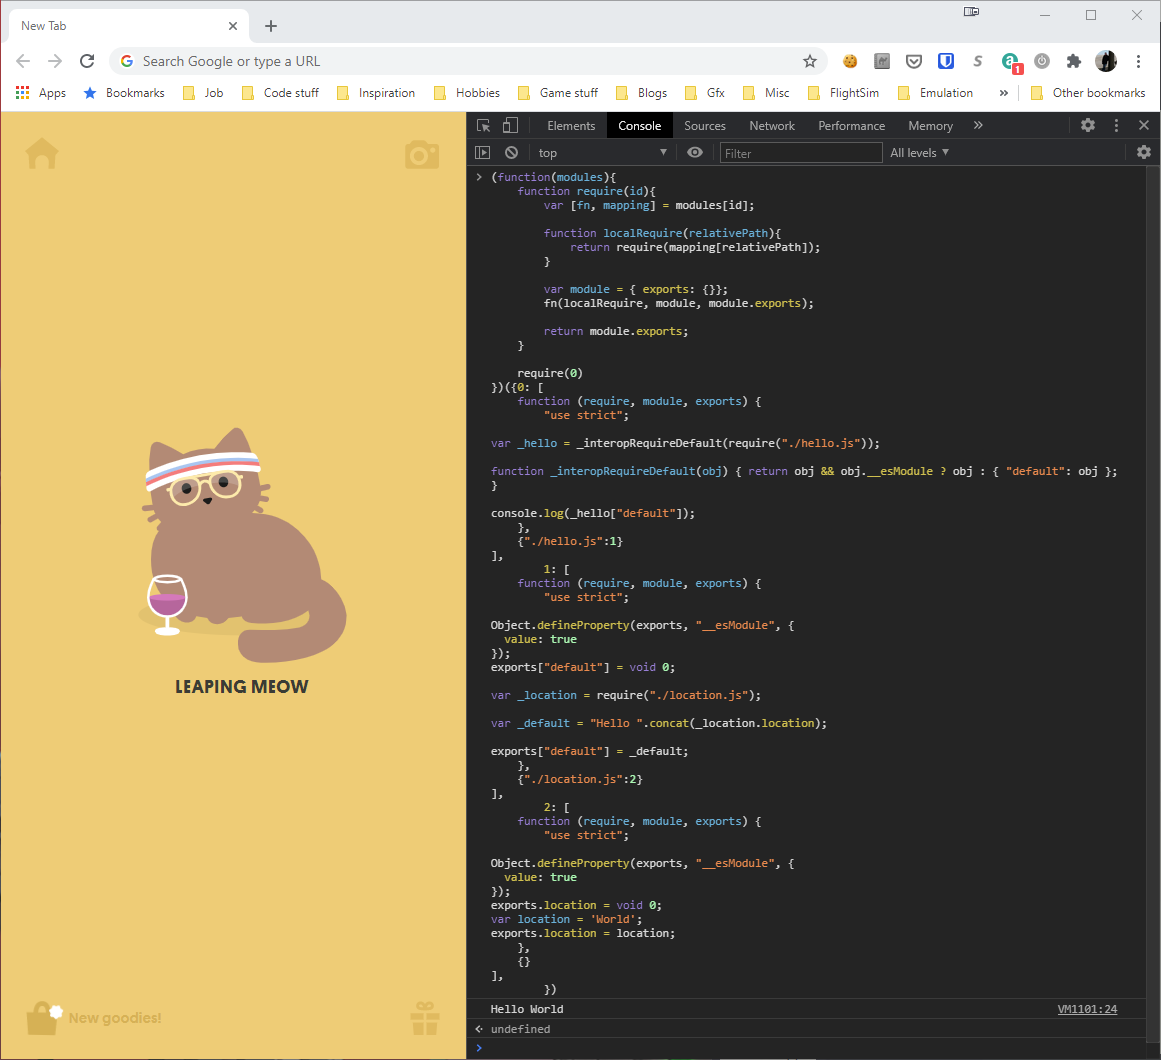
And there is it! The longest way of getting the browser to print out "Hello World" ever!
As you can see, there's quite a bit that goes into making a bundler, but at the same time it's quite fascinating what is going on in the background. Of course bundlers like Webpack and Parcel have way more functionality, but the bare bones is pretty much exactly the same. This one only works with ES6 modules for instance, since we only look for ImportDeclaration in our traverse, and we could definitely build in way more error handling etc.
If you want to learn more about bundlers and how they work, I highly recommend this video of Tobias Koppers (original author of webpack) doing a bundle manually, but with the exact workflow Webpack would do it. The audio is unfortunately a bit screwed up, but even with that I do recommend watching it and try to follow along with what he is doing.
The full bundler code
And here is the full source code for our bundler, for brevity. If you got any error messages, just go through this code and figure out where you might have gone slightly wrong.
const fs = require('fs')
const path = require('path')
const parser = require('@babel/parser')
const traverse = require('@babel/traverse').default
const babel = require('@babel/core')

let ID = 0

const createAsset = filename => {
    // read file from filesystem
    const content = fs.readFileSync(filename, 'utf-8')
    const dependencies = []

    // parse file into ast
    const ast = parser.parse(content, {
        sourceType: 'module'
    })

    // traverse the ast and look for;
    traverse(ast, {
        // our ImportDeclarations
        ImportDeclaration: ({node}) => {
            // push this into our list of dependencies
            dependencies.push(node.source.value)
        }
    })

    // give it a local id and increment our global one
    const id = ID++

    // transform our AST back into code, running it through babel and applying
    // the env preset at the same time - out comes ES5 code the browser can understand, yay!
    const {code} = babel.transformFromAst(ast, null, {
        presets: ['@babel/env']
    })

    // return all the information we need to assemble our graph
    return {
        id,
        filename,
        dependencies,
        code
    }
}

const createGraph = (entry) => {
    // get our initial asset from the entry point
    const mainAsset = createAsset(entry)
    // start a queue with the returned object from the main asset
    const queue = [mainAsset]

    // go through each element in our queue.
    for(const asset of queue) {
        // get the directory name of our asset
        const dirname = path.dirname(asset.filename)
        asset.mapping = {}

        // go through each dependency in current asset
        asset.dependencies.forEach(relativePath => {
            // add the directory name we extracted above to our relative path and filename
            const absolutePath = path.join(dirname, relativePath)
            // create a new asset for this file
            const child = createAsset(absolutePath)
            // add the id to the mapping object with key of our relative path
            asset.mapping[relativePath] = child.id

            // push it into the queue
            // doing this while iterating will make it iterate over it
            // next time
            queue.push(child)
        })
    }

    // return our queue as our graph
    return queue
}

const createBundle = (graph) => {
    // create a new string to store our IIFE arguments
    let modules = ''

    // build the arguments in the form of { ID: [code, mappings] }
    graph.forEach(mod => {
        modules += `${mod.id}: [
    function (require, module, exports) {
        ${mod.code}
    },
    ${JSON.stringify(mod.mapping)}
],
        `
    })

    // create our IIFE that we can output, complete with our own require function
    const result = `
(function(modules){
    function require(id){
        var [fn, mapping] = modules[id];

        function localRequire(relativePath){
            return require(mapping[relativePath]);
        }

        var module = { exports: {}};
        fn(localRequire, module, module.exports);

        return module.exports;
    }

    require(0)
})({${modules}})
    `

    // return the template literal for further processing
    return result
}

// create a graph of all our scripts with dependencies
const graph = createGraph('./src/main.js')
// create the actual bundle
const bundle = createBundle(graph)

// write our bundled code to the console
console.log(bundle)
Complete ./bundler.js